
HomeGrown Solution: Port-a-cath Trainer
Title
Port-a-cath Trainer
Submitted By
HomeGrown Solution Number
Identification of the Problem
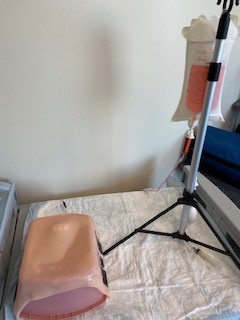
Patient safety relies on effective training of healthcare providers. A nurse educator wanted to train new hire system nurses on the proper way to care for a patient with a port-a-cath. Our institution did not own a port-a-cath trainer. The commercially available port-a-cath trainers are expensive, while this low-cost solution is easily reproducible at minimal costs and can be used repetitively.
Unique Idea
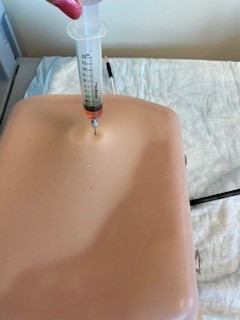
This homemade trainer allows learners to access a port, draw back to check for appropriate placement with blood return, push fluids when the port is accessed, and apply sterile dressings.
Objectives
- To create a low-cost and easy replicated trainer for use in simulation education when performing port-a-cath access and care.
Supplies/Ingredients
- Hospital bath basin or some kind of plastic box
- Port-a-cath and line
- Binder clips
- Simulated skin
- IV bag with blood colored fluid
- Standard IV and silicone tubing 0.25"
- Pressure bag
- Hot glue gun and glue sticks
- Heat gun
- Heat shrinkable tubing 0.5" in diameter
Steps to Creating the Solution
- Connect the port to the port tubing via manufacturer guidelines. Cut the port tubing to the desired length. We cut ours shorter because it is used with a tabletop IV stand.
- Insert the port tubing into the silicone tubing and use the heat gun and heat shrink tubing to seal it.
- Cut a small square into the bath basin. This should be in the upper half of the basin and centered. This square is where the port tubing will be ran through.
- Glue the port to the bath basin above the square that was just cut, and run the tubing through the hole to the other side.
- Insert the IV tubing that is spiked into the IV bag with blood colored solution.
- Place the IV bag on an IV pole. Place a pressure bag and inflate. Prime the tubing so that fluid is ready to be drawn back when access needle is placed.
- Take the simulated skin and cover the bath basin and port. Pull tight and secure with binder clips.
- The port is now ready to be accessed, flushed, and have sterile dressings placed and changed.
Images

Video
HomeGrown Disclaimer
The information contained within this website is for information purposes only. While the website is monitored in an attempt to keep the information up to date and accurate, be aware that there are no representations or warranties of any kind, express or implied, about the completeness, accuracy, reliability, and/or suitability being made. The sponsors of this website are not liable for any loss or damage that may result from using information contained within this website. Any reliance you place on the information contained within this website is strictly at your own risk.
Please note that sections of this website include postings of individuals not associated with the website sponsors. These postings are not endorsed or warrantied by the website, and use of such information is at your own risk.
Always check the user guide/manuals provided by the manufacturer of your manikin or task trainer. Using products that are not sanctioned may invalidate the product warranty. (For example: Some products could stain the skin on a manikin. Liquids used around electrical parts may cause malfunctions.)