
HomeGrown Solution: NGT System for Intake & Output with Auscultation
Title
Submitted By
HomeGrown Solution Number
Identification of the Problem
Unique Idea
Objectives
Supplies/Ingredients
- JP drain
- 1 gravity set of IV tubing
- NG Tube
- Tape to secure NGT to nasal bridge
- Plumber’s tape, scissors, super glue (brush-on works best)
- Absorbable padding
- Small, clear, occlusive dressing (optional)
- Foley bag
- Manikin with removable genitalia
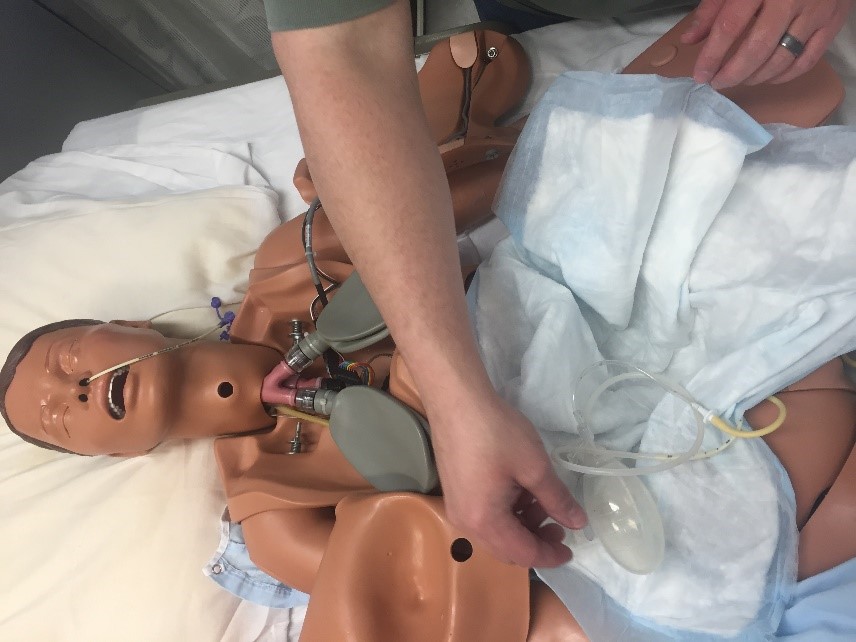
- Stethoscope & syringe to instill air and fluid for placement check
Steps to Creating the Solution
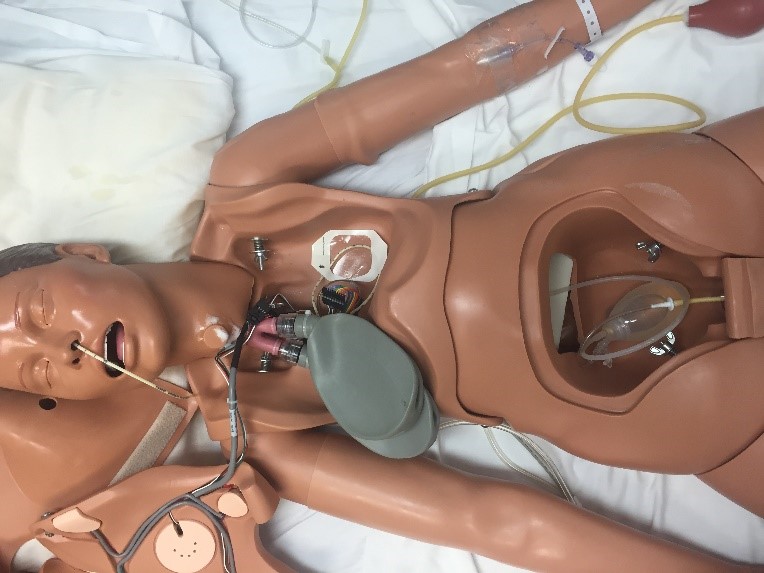
- Open the chest and abdominal cavities of the manikin. Remove any “wet abdomen” the manikin may have in place.
- Place the NG Tube in the desired nare, advancing until it at least reaches the abdominal cavity (further if desired, as long as it can remain in abdominal cavity). May need to manipulate tube to get it to go through chest to abdomen. Secure chest portion of NGT with a clear dressing or tape. Secure the NGT to the nasal bridge with tape per standard procedure.
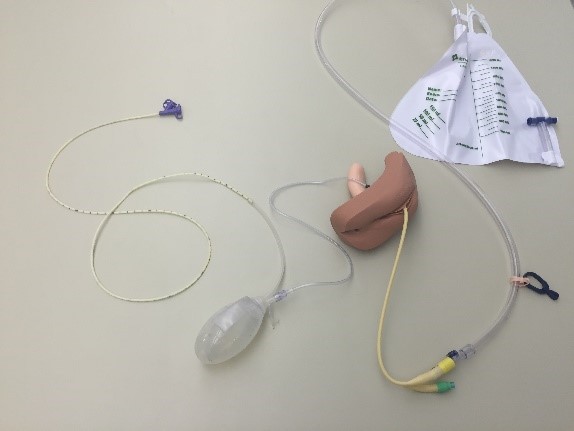
- Cut off the tips (to form a clean edge) of the following supplies with the scissors: a. Cut off the insertion tip of the NGT being used b. Cut off the tip of long end of the JP drain c. The tip of the yellow rubber portion of the foley set up d. Cut approximately an 18-inch straight segment of the IV tubing from the main set. Discard remainder.
- Thread the Foley through the genitalia where it is coming out of the back. Using super glue, connect the Foley tip to one end of IV tubing segment, being careful not to occlude the diameter of the tubes. Reinforce with plumber’s tape.
- Using super glue, attach the other end of the IV tubing segment to the port on the JP drain. Again, be careful not to occlude the diameter of the tubes. Using super glue, connect the cut long end of the JP drain to the cut insertion tip of NGT, being careful not to occlude the tubes’ diameters.
- Place the JP drain and surrounding tubing in the abdominal cavity. Wrap in an absorbent pad in case of leakage.
- Place genitalia in manikin as usual. Replace abdominal and chest plates. Place Foley bag on an appropriate place on the bed frame.
- Proceed with testing the system by (1) auscultating placement using air bolus, (2) instilling fluid, (3) removing fluid. (4) Instill enough fluid to test urine output feature.
- Connection Sequence: NGT------JP drain tube-------JP drain port ------- IV Tubing ----- Genitalia-------Foley with bag
- Note: When system is not in use, empty fluid contents, wash through with a diluted bleach solution, allow to dry, and store disconnected from the manikin.
Images
HomeGrown Disclaimer
The information contained within this website is for information purposes only. While the website is monitored in an attempt to keep the information up to date and accurate, be aware that there are no representations or warranties of any kind, express or implied, about the completeness, accuracy, reliability, and/or suitability being made. The sponsors of this website are not liable for any loss or damage that may result from using information contained within this website. Any reliance you place on the information contained within this website is strictly at your own risk.
Please note that sections of this website include postings of individuals not associated with the website sponsors. These postings are not endorsed or warrantied by the website, and use of such information is at your own risk.
Always check the user guide/manuals provided by the manufacturer of your manikin or task trainer. Using products that are not sanctioned may invalidate the product warranty. (For example: Some products could stain the skin on a manikin. Liquids used around electrical parts may cause malfunctions.)